Joining data
Up until now we have been querying a single table containing all the data related to our invoices: while it’s occasionally possible to encounter such a simple database in the real world, it is definitely an exception rather than the rule. The vast majority of the relational(*) databases you’ll be working with, will have several tables that describe different aspects of the data.
Organizing data into different tables can provide several advantages:
- remove data duplication: if you think back about the
invoicestables that we’ve been querying so far, every row contained the customer name (first + last, or business, respectively) and when a customer had more than one invoice, their name would be repeated over and over; data duplication aside, this can eventually lead to data inconsistency, where customer data is not always the same in all rows related to them. - improve performance: extracting data into several tables enables us to selectively query only some of them according to our needs, which may in turn make the job easier for the DBMS.
As we have briefly mentioned at the beginning of the course, relational databases are able to join data across multiple tables, making use of primary and foreign keys. A primary key is a column (or combination of columns) whose values define the identity of a row, meaning that there cannot be any two rows in the same table with the same value for their primary key. A foreign key is a column that references the primary key of another table and can thus only contain those values that exist over there. For example, in the following diagram.
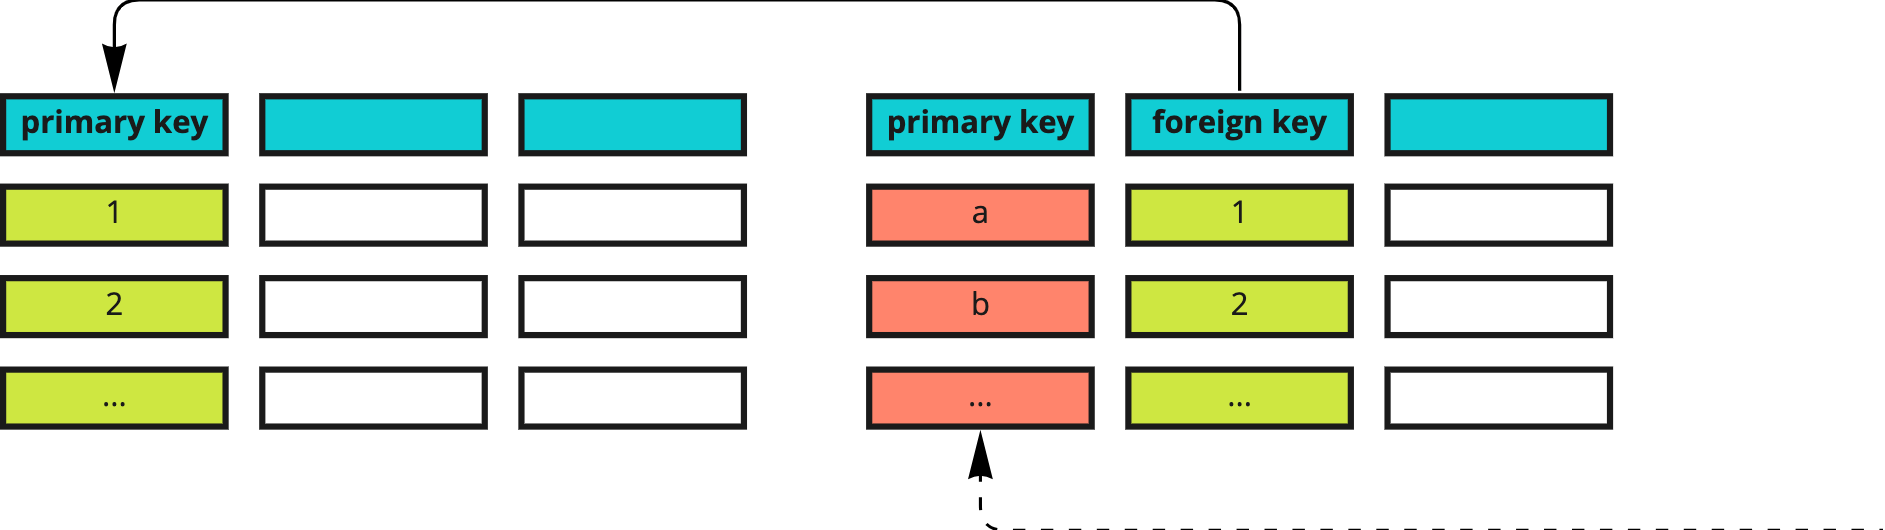
the foreign key of the table on the right contains the values 1 and 2; if the primary key of the table on the left contains all values up to 10, the foreign key on the right will contain all (or some) of them, but cannot contain values that escape this range (e.g. 11, 20, and so on).
From now on, we’ll be using a revisited version of our database.
(*) The emphasis here is on the word relational since there are other types of databases that do store all data in a single table, for legitimate reasons whose explanation escapes the scope of this course.
New database: online learning platform
Let’s imagine that we are running an online learning platform, where customers sign up for a (free or paid) subscription and can purchase online courses and/or private lessons with tutors: this means that our invoices are now calculated based on purchased services, which have a fixed unit price for simplicity’s sake (e.g. an online course always costs € 15). All services connected to an invoice are stored in the sales_invoice_lines and subscription_invoice_lines, respectively. Just as in the previous database, we can have both private and business customers, we’re operating in several countries, and invoices may or may not have already been paid.
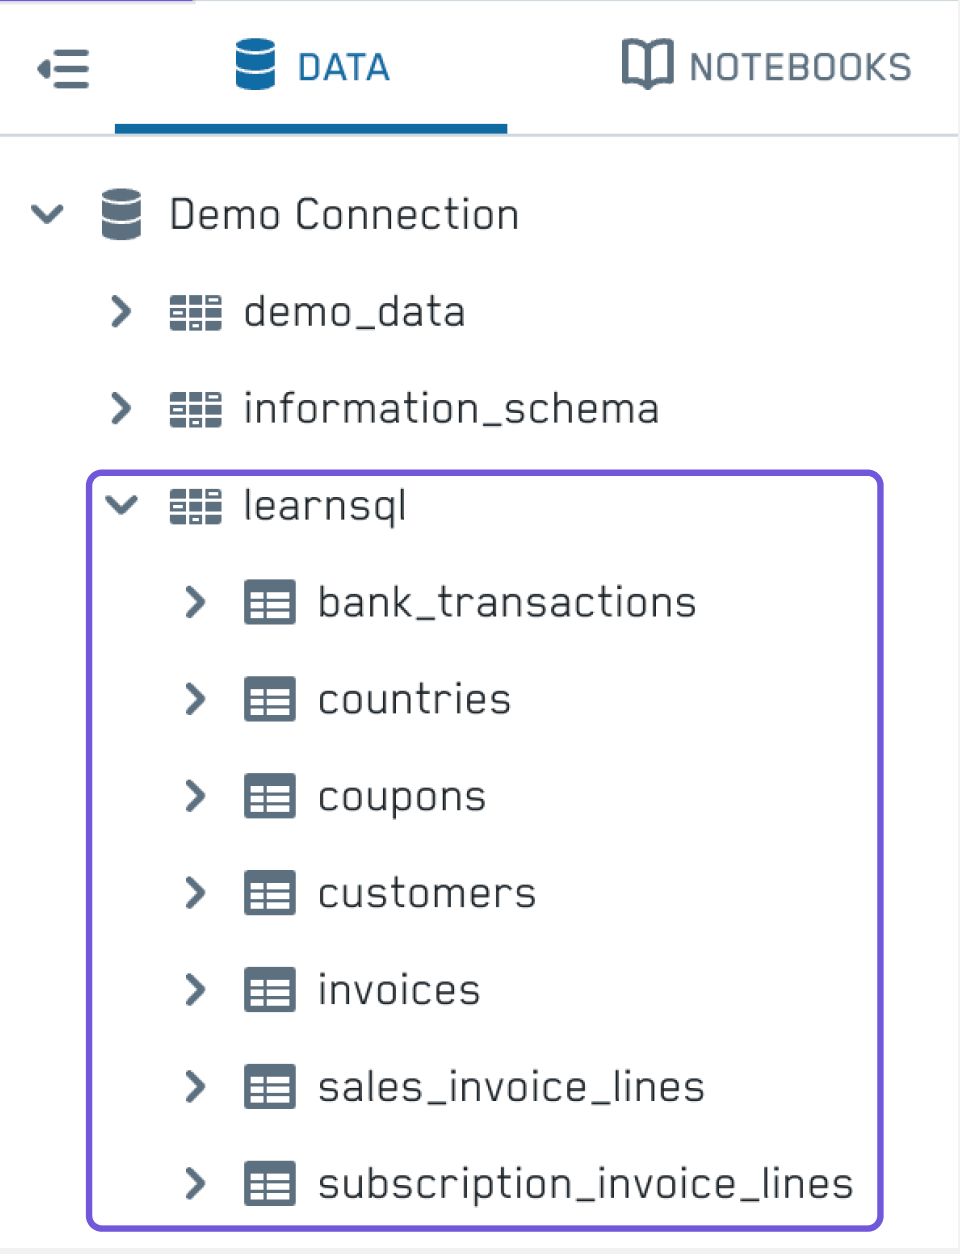
Here’s a quick overview of our new database:
Our invoices table now looks like this:
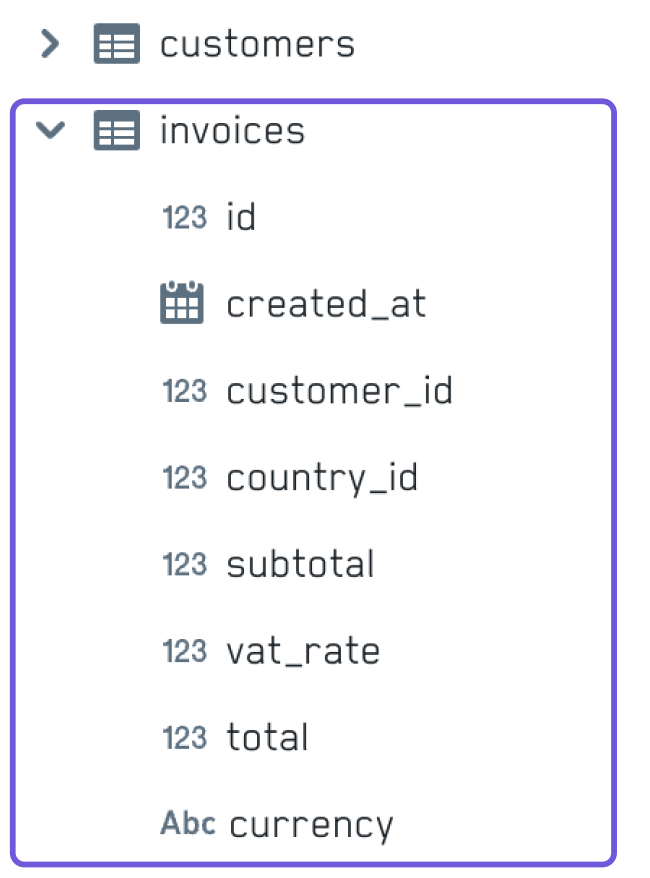
A lot of data has been extracted into dedicated tables and linked by means of foreign keys: for example, instead of several columns to describe customer details we now have a customer_id column, and instead of the country name we now have a country_id column: both are foreign keys that point to the id columns of the respective tables.
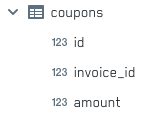
Let’s also look at a new table which we’ll be using to explain the different ways of joining data, coupons: each row in it contains an id, the id of the invoice it relates to, and the amount of the discount applied to that invoice; if an invoice has not received any discount, there will be no row in the coupons table mentioning that invoice_id.
Inner join
The first type of join we’ll look at is called inner join and it returns all and only the rows that have a matching value for the join condition in both tables; this type of joins is the right choice when your problem statement is something like:
“I would like to only get the invoices that have received a discount, along with the discount details.”
Let’s look at a practical example that queries the invoices table along with the coupons table:
SELECT *
FROM learnsql.invoices
JOIN coupons ON invoices.id = coupons.invoice_id;
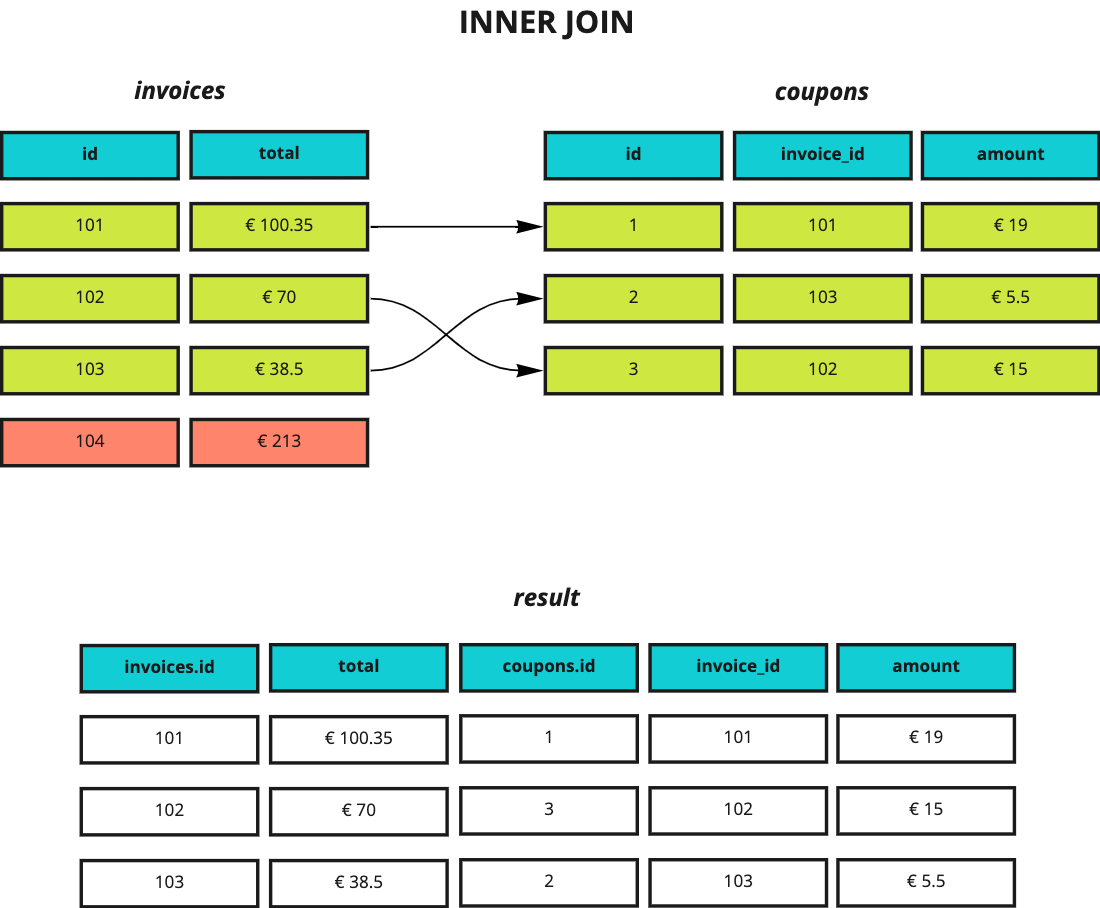
The row in red has not been selected because there’s no row in coupons for that invoice (the invoice didn’t receive any discount, essentially).
Left Outer Join
Let’s now look at another type of joins, the left outer join (often simply called left join), a type of join returning all rows in the left table (which is, literally, the one to the left of the LEFT JOIN keywords - in this case, invoices) along with any matching rows in the right table, filling any missing data with NULL values.
“I would like to get all invoices; if an invoice received a discount, I would like to see its details as well.”
SELECT *
FROM learnsql.invoices LEFT JOIN learnsql.coupons ON invoices.id = coupons.invoice_id;
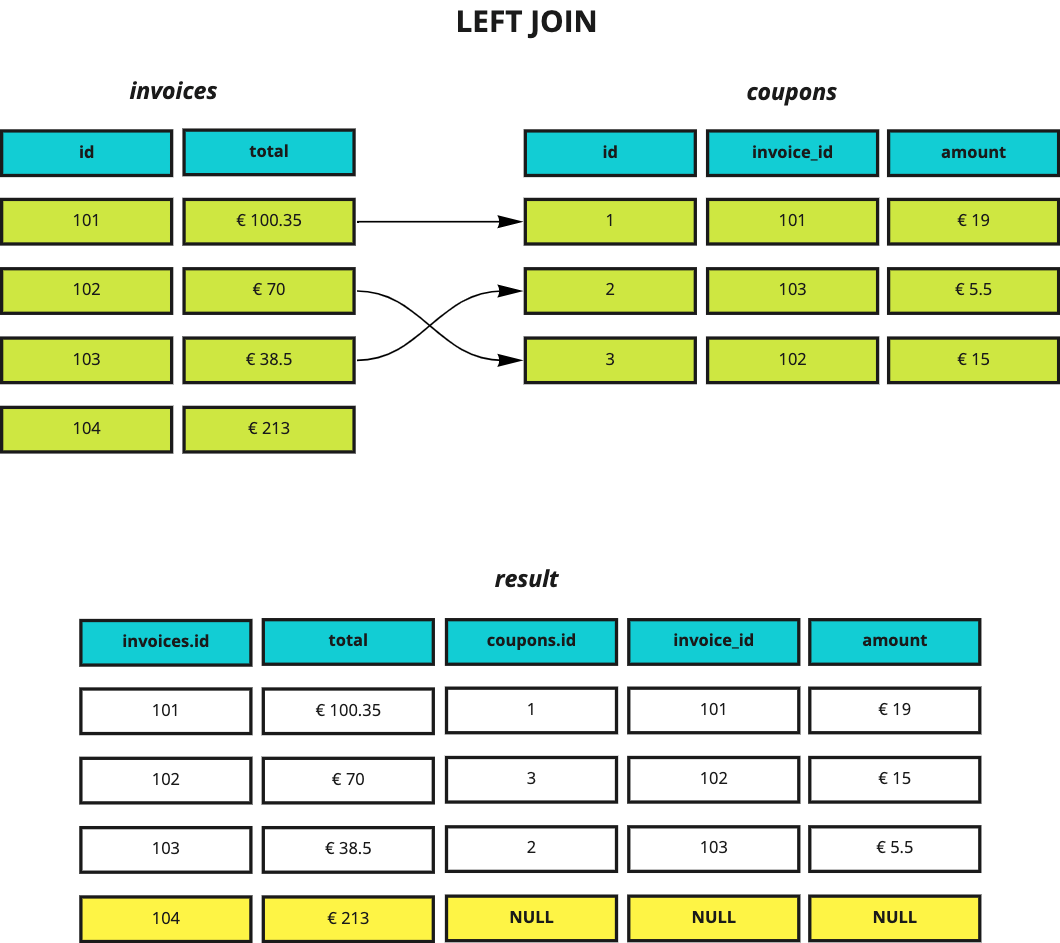
As you can see, even though there’s no row in coupons for invoice 104, that row is still present in the results and all columns related to coupons are filled with NULL.
Right Outer Join
The right join returns all rows in the right table along with any matching rows in the left table, filling any missing data with NULL values. Yep, you’re not seeing things: it behaves just like a left join, but “starting” from the right table. In fact, you can literally take the above query, invert the table order, and obtain the very same result.
SELECT *
FROM learnsql.coupons RIGHT JOIN learnsql.invoices ON invoices.id = coupons.invoice_id;
Full Outer Join
The full outer join is a combination of the left and right joins returning all rows in both tables and filling any missing data with NULL as needed, be it on the left or on the right.
Combining multiple tables
The examples we have seen so far joined two tables, but we can actually join over multiple tables at the same time… and we can use any of the SQL features we’ve already seen, by the way! This example returns the total discount amount that has been granted in each invoicing country:
SELECT
countries.name,
sum(coupons.amount) AS total_discount
FROM learnsql.invoices
JOIN learnsql.countries ON invoices.country_id = countries.id
JOIN learnsql.coupons ON invoices.id = coupons.invoice_id
GROUP BY countries.name
ORDER BY countries.name;
Side note: aliases and expressions’ positions
When working with multiple tables, it is useful to assign aliases to table names, to avoid having to type their names over and over:
SELECT
cn.name,
sum(cp.amount) AS total_discount
FROM learnsql.invoices AS i
JOIN learnsql.countries AS cn ON i.country_id = cn.id
JOIN learnsql.coupons AS cp ON i.id = cp.invoice_id
GROUP BY cn.name
ORDER BY cn.name;
By convention, the first letter of each table name is used as its alias: countries and coupons both start with c though, so we added another letter (cn and cp, respectively).
This considerably reduced the amount of typing, but we can do even more: we can use expressions’ positions in the grouping and sorting clauses. Let’s see a practical example:
SELECT
cn.name,
sum(cp.amount) AS total_discount
FROM learnsql.invoices AS i
JOIN learnsql.countries AS cn ON i.country_id = cn.id
JOIN learnsql.coupons AS cp ON i.id = cp.invoice_id
GROUP BY 1
ORDER BY 2 DESC;
Try it in the Notebook
cn.name is the first expression listed in the SELECT clause, so we can replace
GROUP BY cn.name
with
GROUP BY 1
Likewise, sum(cp.amount) AS total_discount is the second expression so we can replace it with 2. If we had a third expression, it could be replaced with 3, and so on…
Note: expressions’ positions should be used with caution, since they can reduce the readability of the query; moreover, they are error prone, because a change in the order of the expressions in the SELECT clause will directly impact them, so you’ll have to remember to update the grouping and/or sorting clauses accordingly.
Practice
Are you ready to practice what you’ve just learned? Head over to the Notebook and try to solve the exercises you find there!
Note: the solution to each exercise is in the collapsed block right below it: you can expand it by clicking the arrow icon that appears on the far left when you hover it.
Resources:
- Can we stop with the SQL JOINs venn diagrams insanity
Note: the article itself makes an argument against a popular way of visualizing joins and may not be very interesting to you: the animations at the bottom of the article are, however, very useful to understand how joins work (from a logical point of view) - SQL Joins Explained
- SQL Join Examples