Real World examples
Marketing email
Here is how you can use Jinja to generate personalized greetings and product recommendations based on data about the recipient.
First, you'll define a Jinja template for the email:
Hi {{ first_name }},

We think you might like these products:

{% for product in recommended_products %}
- {{ product.name }} (€{{ product.price }})
{% endfor %}

Thanks for choosing our brand!

Best,
The Marketing Team
In this template, there are two variables that will be filled in later:
first_name: The first name of the recipientrecommended_products: A list of products the recipient might be interested in
Next, you'll write some Python code to generate the email using the Jinja template:
from jinja2 import Template

# Define the Jinja template
email_template = Template("""
    Hi {{ first_name }},

    We think you might like these products:

    {% for product in recommended_products %}
    - {{ product.name }} (€{{ product.price }})
    {% endfor %}

    Thanks for choosing our brand!

    Best,
    The Marketing Team
""")

# Define the recipient data and recommended products
recipient_data = {
    'first_name': 'Jennifer',
	# other fields as needed ...
}
recommended_products = [
    {'name': 'Product A', 'price': 19.99},
    {'name': 'Product B', 'price': 29.99},
    {'name': 'Product C', 'price': 49.99},
]

# Render the email using the Jinja template and recipient data
email_content = email_template.render(
    first_name=recipient_data['first_name'],
    recommended_products=recommended_products,
)

# Send the email using your email service provider
# ...
In this example, you first define the Jinja template for the email. Then you define the recipient data, which includes the recipient's first name. You also define a list of recommended products based on some sort of recommendation algorithm.
Finally, you use the render() method to fill in the template with the recipient data and generate the final email content. You can then send the email using an email service provider or some other method.
Jinja and SQL
Here is how you can use Jinja in a simple Python ETL (Extract, Transform, Load) job. In this example, you will use it to load data into a new table.
First you'll define the template for a query, making it generic enough that it can be reused across multiple tables. For example, something like:
SELECT *
FROM {{ source_table }}
WHERE created_at >= '{{ start_date }}' AND created_at <= '{{ end_date }}'
In this template, there are three variables that will be filled in later:
source_table: The name of the table you want to extract data fromstart_date: The start date for the data you want to extractend_date: The end date for the data you want to extract
Next, write your Python code to generate the SQL statement using the Jinja template and load the data into a new table. For example:
import psycopg2
from jinja2 import Template

# Define the Jinja template
sql_template = Template("""
    SELECT *
    FROM {{ source_table }}
    WHERE created_at >= '{{ start_date }}' AND created_at <= '{{ end_date }}'
""")

# Define the parameters for the SQL statement
params = {
    'source_table': 'orders',
    'start_date': '2023-02-01',
    'end_date': '2023-02-28',
}

# Render the SQL statement using the Jinja template and parameters
sql_statement = sql_template.render(params)

# Connect to the database
conn = psycopg2.connect(database="your_database", user="your_username", password="your_password", host="your_host", port="your_port")
cursor = conn.cursor()

# Execute the SQL statement and load the data into a new table
cursor.execute(sql_statement)
new_table_name = 'orders_2023_02'
cursor.execute(f"CREATE TABLE {new_table_name} AS {sql_statement}")
conn.commit()

# Close the cursor and the connection
cursor.close()
conn.close()
In this example, you first define the Jinja template for the SQL statement. Then you define the parameters to fill in the template, including the name of the source table, the start and end dates for the data to extract.
Next, you use the render() method to fill in the template with the parameter values and generate the final SQL statement. You then connect to your database and execute the SQL statement using a cursor. Finally, you create a new table with the extracted data using a CREATE TABLE statement and commit the changes.
Don't forget to close the cursor and the connection once you're done!
Jinja in PushMetrics
You can actually use Jinja in PushMetrics without having to write any Python code: you can, in fact, write Jinja expressions in any Notebook block and even preview them in SQL, Slack, and Email blocks.
A practical example (available among the New Notebook templates): you want to send an email to a list of customers, customizing it for each of them (a Mail Merge).
The following screenshot shows how easy it is to do it in a PushMetrics Notebook:
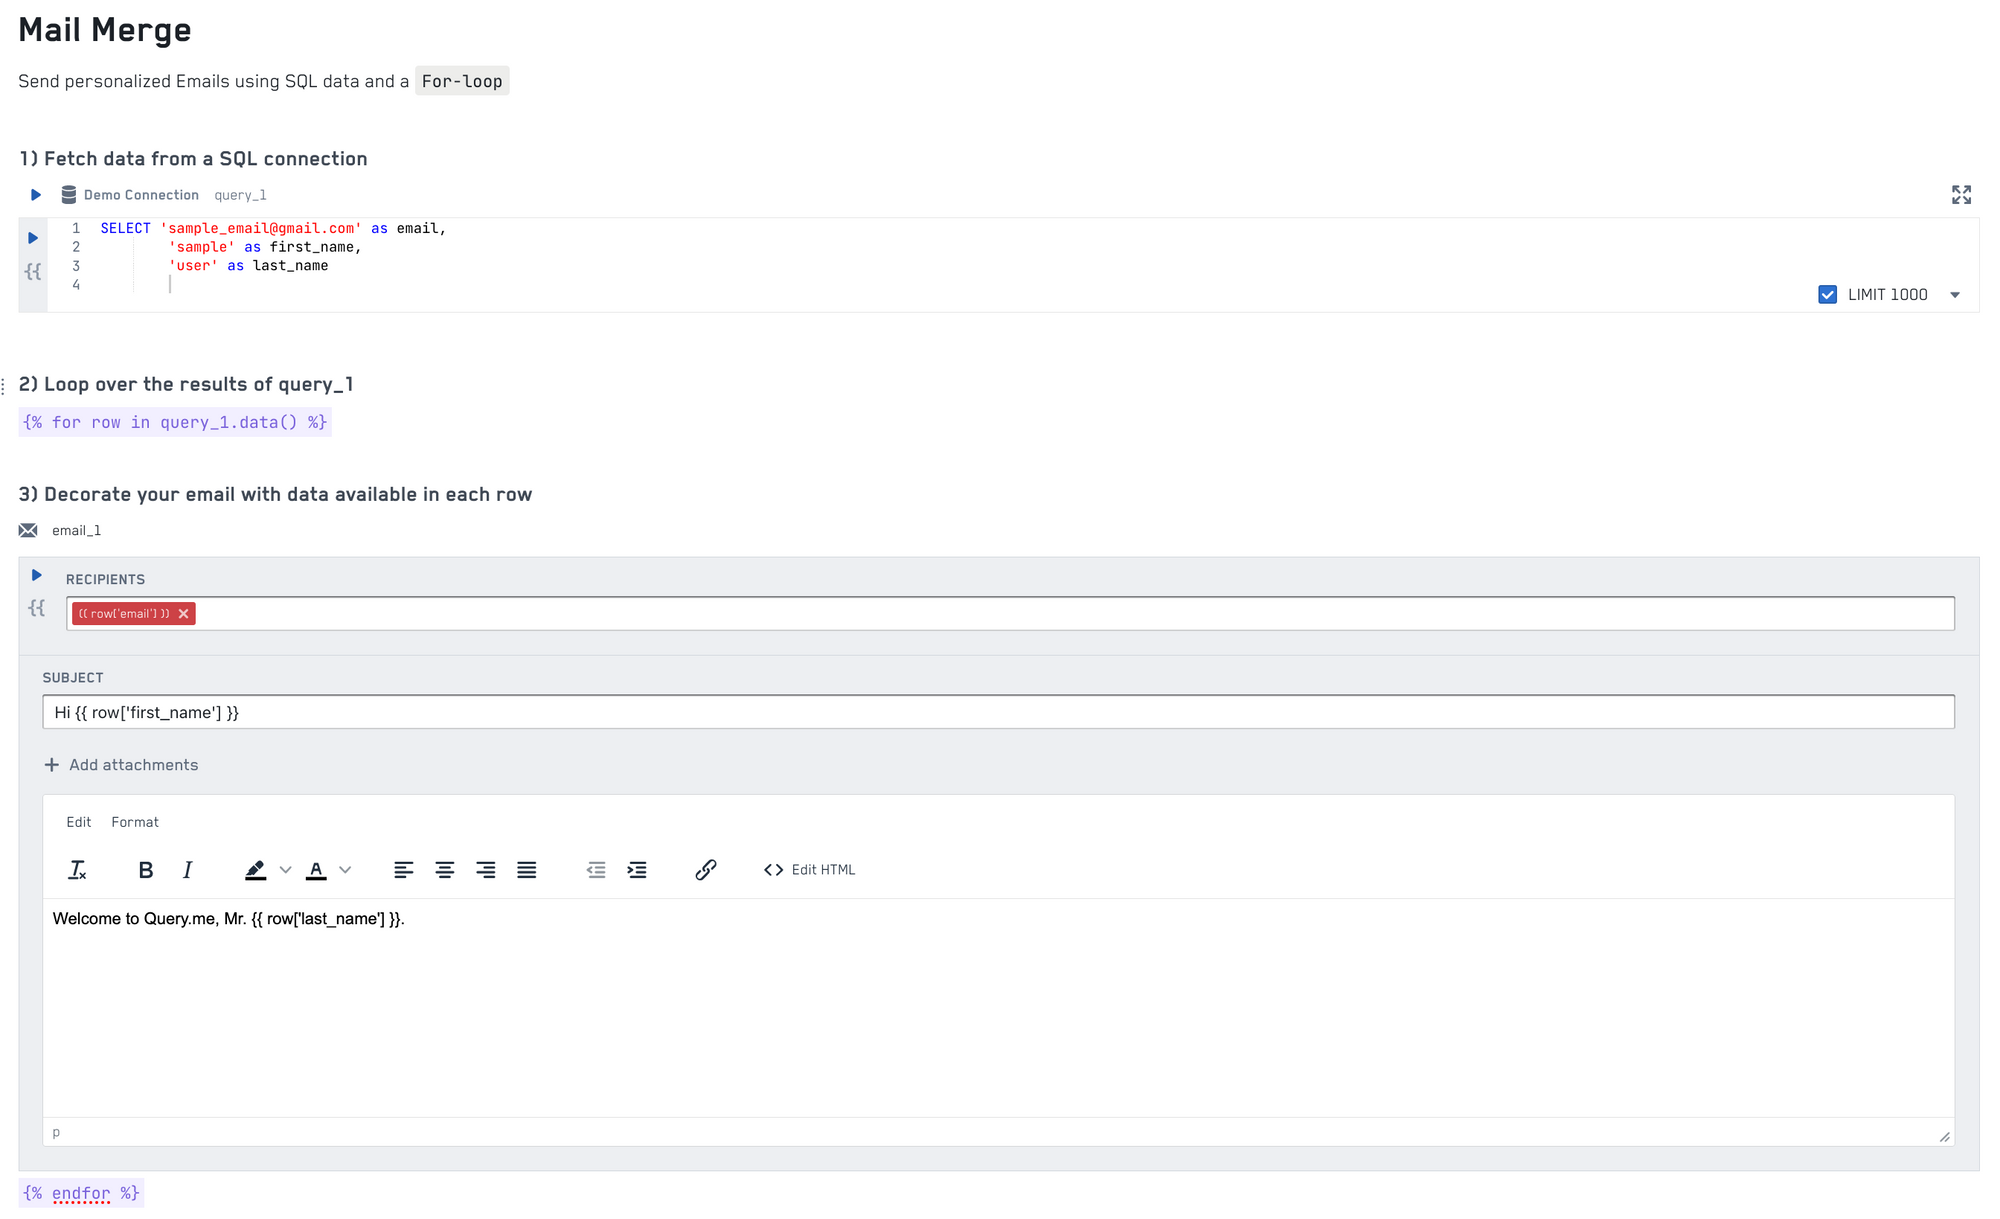
Please note what the notebook is doing:
- it declares a
query_1query that retrieves customer data from a database connection - it declares a Jinja
forloop that iterates over the results of the previous query by callingquery_1.data(), where each row represents one customer - it uses the data of the current customer (identified by the
rowvariable), to set the appropriate email address and customize the email contents - finally, it closes the loop using
endfor
When you Execute the Notebook, PushMetrics will query the database connection you provided, get the list of customers and send out an email to each of them.
Note: There is no special Jinja block: for/endfor are declared in regular Text blocks (the same applies to if/endif, and so on)!